-
07-11-2015, 06:27 PM
#151
Champion Member

That bevel on the rear panel was probably the hardest part of the bodywork I had to negotiate. Eventually I bought some Home Depot 1" angle aluminum, and put some PSA sandpaper on it and used it to finally get a straight edge and angle on the bevel, even in the corners (where the angle aluminum was cut at 45º to promote a sharp corner. It was a frustrating process prior to that. A short sanding block is pretty good once you get the bodywork shaped correctly. A long board (what I call an "idiot Stick" because it allows even a novice a better chance at a straight body) ensures long flat areas and long curves/corners are flat (something about the length of an air-file or the standard PSA paper). Once I'm ready for wet sanding, I start using the smaller blocks or pads. By then, it's a lot harder to sand waves or imperfections into the panels.
Some of my favorite hand tools to get a perfect body:
The best small sanding block I've ever used. The same size as a typical small sanding block:
http://www.amazon.com/3M-Stikit-Atta...sanding+blocks
A great intermediary block that is longer than the small ones, but shorter than the idiot sticks:
http://www.amazon.com/3M-5441-Stikit...sanding+blocks
About the best "long" sanding block out there:
http://www.hillas.com/Categories/3M-...4toaAi_t8P8HAQ
A good soft 600 grit or finer sanding block. It conforms to a lot of small curves and corners:
http://www.amazon.com/3M-05442-Stiki...sanding+blocks
The old-style blocks where the paper is folded under and punctured by three nails works okay, but they rarely are perfectly flat. The 3M stuff is about as good as it gets.
Last edited by Blueovalz; 07-11-2015 at 06:41 PM.
-
08-28-2015, 09:29 AM
#152
Administrator

That was real creative with the rear tail lights!
-
09-27-2015, 01:19 PM
#153
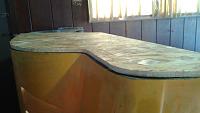
Prepping fiberglass parts.

Many more areas to fix.
-
09-27-2015, 09:13 PM
#154
Champion Member
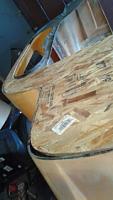
Not sure what I am looking at other than some vise-grips on the right side.
-
09-28-2015, 08:30 AM
#155
The rear hatch. The back window is above the visegrip. Previous owner cut out this area, I am putting the glass back. Just 1 of many cut or drilled or damaged places that need to be redone.
-
12-12-2015, 11:45 PM
#156
The hatch closes and does not look right on the passenger side.
From the drivers side I made a wood template.
Here it is, flipped over to the passenger side.
When I close the rear hatch the passenger side does not match up so good.
Last edited by Jerry; 12-13-2015 at 05:43 AM.
-
12-12-2015, 11:46 PM
#157
The hatch is warped. The geometry of the wood is right. The fiberglass needs to be reshaped so it matches the template.
Last edited by Jerry; 12-13-2015 at 05:45 AM.
-
12-13-2015, 05:52 PM
#158
Champion Member
When I was remaking my bodywork, I felt the OEM Manta body panels were not "warped", but simply laid on a asymmetric molds.
-
12-14-2015, 02:43 PM
#159
I think you are right. That area does look asymmetric. The previous owner cut out the webbing, as if to clear the 45 deg roll bar. I glassed it and now I am reglassing it in a little different position.
When the webbing was cut, the hatch shell shape opened up some.
Last edited by Jerry; 12-14-2015 at 02:49 PM.
-
12-14-2015, 08:27 PM
#160
like this:
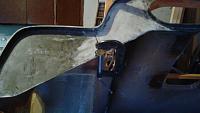
the white area was mostly cut out. I glassed it back but the shape had opened up.
To bring it back I made the cut you see, pulled the side in, clamped it, and glassed a small tab.
Now I will remove the clamp and shut the hatch and check the work.
Better fit now is less bondo.
 Posting Permissions
- You may not post new threads
- You may not post replies
- You may not post attachments
- You may not edit your posts
-
Forum Rules


 Reply With Quote