-
Champion Member

Black Mirage Build Diary
I've posted my build diary on the Yahoo Manta Group website but some folks have had difficulties in seeing the photos there. I'll post in parallel here and hopefully it will be easier to navigate this site.
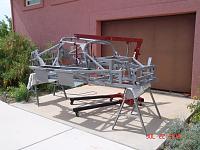
Briefly, long go I bought an unassembled Manta Mirage kit from a local fellow with the idea of building it into a dual- purpose street/track car. The build started off in that direction but I soon realized that the compromises necessary would result in an overweight, uncompetitive track car and a totally unsuitable street machine. About that time I attended Speed Week at Bonneville for the first time and decided that this Mirage was going to be built to SCTA (Southern California Timing Association) rules. A few car shows might be the only other option.
I'll attach a couple of pictures that show the general idea and also a few details.
-
Champion Member
In August I assembled the car in its still- unfinished state and trailered it up to Bonneville to get it looked over by the SCTA tech inspector. This way I could find out if there were any problems and then have time to remedy them as the build finished. No such luck-- Speed Week was completely rained out; there was 6" of water covering the salt flats. I found a couple of inspectors who gave it a quick look but that was all. As they say "That's racing".<br><br type="_moz">
-
Champion Member
Chassis
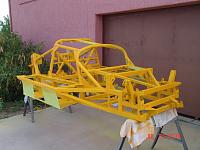
SCTA rules require a very sturdy roll cage as well as on- board fire extinguishers, parachute, race tires, etc. I added a full roll cage and after all the welding was finished I had the bare chassis sandblasted. Next was a two- part zinc chromate epoxy primer followed by a topcoat of two- part polyurethane isocyanate resin.
-
Champion Member
-
Champion Member
Instruments
The driver's view photo was taken before the top roll cage tubes were added and a titanium sheet was riveted across.
-
Champion Member
-
Champion Member
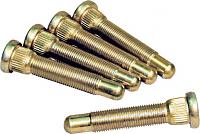
Rear Hub Studs
These are the 5/8" wheel studs from ARP. The rounded nose makes slipping on the 1" (across the flats) lug nuts easy and the long unthreaded section holds the nut straight so that it can't be cross- threaded.
-
I like it!
It has a look influenced by an Apachi helicopter or something, Cool. :-)
I think there are 5 Mantas within 150 miles of Willow Springs Calif.
That would be a fun race if we can all get them finished.
Looks like you have a lot of hours into that frame.
-
Champion Member
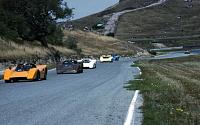
Manta Reunion
 Thanks, Jerry-- beaucoup hours is right!
There was a Manta get together at Laguna Seca around 1979. Someone named "Leo" at Manta Cars took this picture:
-
Administrator

I love these build threads. Thanks for posting over here as well. If you or anyone has any issues navigating this site please let me know.
I've started a Manta reunion thread here:
http://mantacarsforum.com/showthread...-Manta-Reunion
I would be in for a reunion at some point. I don't want to hi-jack this thread so I'll post on the other thread about my thoughts on the reunion.
Tags for this Thread
 Posting Permissions
- You may not post new threads
- You may not post replies
- You may not post attachments
- You may not edit your posts
-
Forum Rules


 Reply With Quote