Page 2 of 2 FirstFirst 12
Results 11 to 18 of 18

Thread: Building an "A" type hip-spoiler for the Manta

  1. #11
    Champion Member Blueovalz's Avatar
    Join Date
    Jul 2014
    Location
    Little Rock, AR
    Posts
    279
    First coat of Duratec, and having to address some pinholes. Starting to shape up nicely now.


    And wet sanded. Ready for the paint!!!!


    Underside of the mounting flange to show this is basically a hollow piece (foamed in) of roughly .140" thick fiberglass. Once screwed in place, very rigid and sturdy considering the underside of the rear hatch has also been reinforced along the back panel, with large ribs spanning from the top lip, down to the hinge-bolts, so that nothing collapses at high speed.
    Last edited by Blueovalz; 02-06-2019 at 05:07 PM.

  2. #12
    Champion Member Blueovalz's Avatar
    Join Date
    Jul 2014
    Location
    Little Rock, AR
    Posts
    279
    Spot-faced all the screw holes for neatness, and especially for those holes that were in the middle of a concave curve, or where the surface of the flange was not parallel with the fastener head. Lastly, and almost forgotten completely, a hole was required for the back-up/rear view camera. the old camera was in poor shape, so I replaced it with another that had to be mounted differently. Good old Ebay…nothing sold a couple of years ago is sold today. Fortunately, whenever I buy anything for the car, I buy spares. So I've got several new cameras, thus if this one fails in the future, I've got another identical to it. Now it's officially ready for paint...if it ever warms up again...while I'm in town....grrrrrrrr.


  3. #13
    Pole Position Member
    Join Date
    Jan 2019
    Location
    Western Canada
    Posts
    60
    Very nice work.

  4. #14
    Champion Member Blueovalz's Avatar
    Join Date
    Jul 2014
    Location
    Little Rock, AR
    Posts
    279
    Contingency plan: If the rear spoiler upsets the balance, or provides too much rear downforce, I'm fabricating some fences and a dam for the front of the car to provide some front downforce. The fences should keep the air from spilling over the side/front of fenders, and thus force the air over the top of the front of the car. The dam should improve the high pressure over the top of the radiator cover.

    Last edited by Blueovalz; 02-26-2019 at 09:23 PM.

  5. #15
    Champion Member Blueovalz's Avatar
    Join Date
    Jul 2014
    Location
    Little Rock, AR
    Posts
    279
    Squirted some paint on the spoiler. Still needs a clear coat, but have some blemishes to resolve before that happens.


  6. #16
    Pole Position Member
    Join Date
    Aug 2018
    Location
    Chatham ontario canada
    Posts
    54
    Looks awesome!!!

  7. #17
    Pole Position Member
    Join Date
    Aug 2018
    Location
    Houston, Tx
    Posts
    89
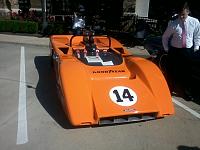
    Hi Terry do you mind sharing what was the actual color/paint code you used to paint your replica? I've been looking for the right color, I've sampled ford school bus yellow and from the modern BMW Mini Cooper cars, volcanic orange B70 and Mellow Yellow A56, now looking at Hyundai Veloster yellow (Sun Flower SYYH). All touch up samples but they just don't look right, maybe touch up paints I got were just not mixed that accurately.

  8. #18
    Champion Member Blueovalz's Avatar
    Join Date
    Jul 2014
    Location
    Little Rock, AR
    Posts
    279
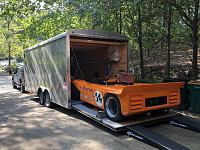
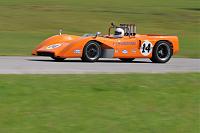
    This is a case of the blind leading the blind. I went with what my eye saw, and that may be different than what someone else's eye sees. I tried to consider photos of original McLarens, taking into consideration different film coloring and age of photos, etc. So basically a crap shoot. What I came up with was using a Fiat color (keep in mind, my computer bit the dust, am awaiting the backup for all the data I had on it, and a new computer is on the way, so this is off the top of my head) called Arancio Narciso. AR68412 is a ProSpray number (2005 Fiat color) based on a can of touchup I still have in the garage. If I remember correctly, it's a pretty simple formula of red, yellow, white, and black. I reduced the red, increased the yellow (by maybe 20% ???) to obviously reduce the red, and increase the yellow for a slightly less red than the fleet color to make it more orange in my own opinion (duh, yeah, but I had to say that). Also, I may have reduced the black a little, and increased the white (by maybe 5%) to increase the tint, or make it less intense. who knows if its right?

    Google the color, and you'll sort of see what it looks like. IMHO, the color in can is more intense, which is why I tinted it down, and made it more yellow for my car.
    Click image for larger version. 

Name:	IMG_3725.jpg 
Views:	9 
Size:	98.6 KB 
ID:	1326

    Click image for larger version. 

Name:	41741910_10103671248181217_2157713766177832960_o.jpg 
Views:	10 
Size:	82.2 KB 
ID:	1327

    Click image for larger version. 

Name:	Terry's M8E 1.jpg 
Views:	8 
Size:	87.1 KB 
ID:	1330
    Last edited by Blueovalz; 10-06-2021 at 04:24 PM.

Posting Permissions

  • You may not post new threads
  • You may not post replies
  • You may not post attachments
  • You may not edit your posts
  •