Page 9 of 10 FirstFirst ... 78910 LastLast
Results 81 to 90 of 94

Thread: Dave Bivens Mirage Build

  1. #81
    Champion Member Manta22's Avatar
    Join Date
    Jul 2014
    Location
    Tucson, AZ
    Posts
    124
    That is a very fast-opening way to raise the headlights. Your video explains it very well. Nice looking assistant, too.

    On MANTA 2, the manual pop-up mechanism had been removed because the Mustang II front suspension conversion interfered with their original raising handle. I replaced it with a small linear actuator that raised both headlights. It was a small 24V surplus item marked "TWA Airlines" !
    Regards, Neil Tucson, AZ

  2. #82
    Champion Member Manta22's Avatar
    Join Date
    Jul 2014
    Location
    Tucson, AZ
    Posts
    124

    Door Support

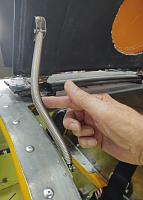
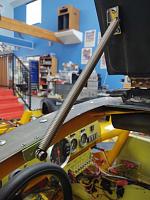
    I got tired of replacing the gas struts on my Black Mirage and finally hit upon a very simple method of holding the upper doors in a raised position. These are coil springs intended for marine applications to hold open hatches and access doors. The principle is this: In compression, a long coil spring acts like a column when it is coil-bound but if it is pushed sideways just a little, it collapses. This works great in my application. I used a 9/16" dia stainless steel coil spring, 10 1/4 " long on my driver's side upper door and to open it, I use my left hand to push up the door past the point where the spring kicks in straight and then let go. The door stays raised until I push on the spring and it allows the door to be closed. This should work with your door latch approach, Dave.

    https://www.amazon.com/gp/product/B077QWB7TX/ref=ppx_yo_dt_b_asin_title_o09_s00?ie=UTF8&psc=1
    Click image for larger version. 

Name:	Spring Support 2.jpg 
Views:	8 
Size:	64.5 KB 
ID:	1336Click image for larger version. 

Name:	Spring Support 4.jpg 
Views:	7 
Size:	53.7 KB 
ID:	1337
    Regards, Neil Tucson, AZ

  3. #83
    Pole Position Member
    Join Date
    Aug 2018
    Location
    Houston, Tx
    Posts
    89
    Thanks for the idea, I like it

  4. #84
    Pole Position Member
    Join Date
    Aug 2018
    Location
    Houston, Tx
    Posts
    89
    Been a while since posting I just noticed, been doing a lot of body work, finally got everything close to paint, panel gaps looking good, etc. Click image for larger version. 

Name:	IMG_20230219_180414717.jpg 
Views:	2 
Size:	95.8 KB 
ID:	1347Click image for larger version. 

Name:	IMG_20220424_211404862.jpg 
Views:	3 
Size:	83.3 KB 
ID:	1348Click image for larger version. 

Name:	IMG_20221105_183331567.jpg 
Views:	3 
Size:	87.6 KB 
ID:	1349

  5. #85
    Pole Position Member
    Join Date
    Aug 2018
    Location
    Houston, Tx
    Posts
    89
    Rear hatch latch, I setup the rear cover latches the same as a Ultima car but still wanted something as sort of a safety latch/verification that the rear is all the way closed so added something to do that. I setup a quick release pin, inserts from the cabin, through the bulkhead mounting bracket and into a plate mounted to the rear cover. Also when fully engaged it triggers a snap action switch that illuminates a small green lamp on the dash.Click image for larger version. 

Name:	IMG_20230524_182704625.jpg 
Views:	4 
Size:	97.5 KB 
ID:	1350Click image for larger version. 

Name:	IMG_20230324_175708637.jpg 
Views:	4 
Size:	89.2 KB 
ID:	1351Click image for larger version. 

Name:	IMG_20230324_175730744.jpg 
Views:	4 
Size:	83.9 KB 
ID:	1352

  6. #86
    Pole Position Member
    Join Date
    Aug 2018
    Location
    Houston, Tx
    Posts
    89
    Fuel Filler, wanted to get it out of the engine compartment,Click image for larger version. 

Name:	IMG_20230211_143850796.jpg 
Views:	5 
Size:	96.1 KB 
ID:	1353Click image for larger version. 

Name:	IMG_20230212_151433410.jpg 
Views:	5 
Size:	93.1 KB 
ID:	1354Click image for larger version. 

Name:	IMG_20230212_142108084.jpg 
Views:	4 
Size:	88.7 KB 
ID:	1355Click image for larger version. 

Name:	IMG_20230212_142115408.jpg 
Views:	4 
Size:	82.1 KB 
ID:	1356Click image for larger version. 

Name:	IMG_20230211_144331169.jpg 
Views:	4 
Size:	85.9 KB 
ID:	1357

  7. #87
    Pole Position Member
    Join Date
    Aug 2018
    Location
    Houston, Tx
    Posts
    89
    Also made a gear position indicator, you can get these digital motorcycle gear displays from china for about $10, just buried it in epoxy using the horn button as the formClick image for larger version. 

Name:	IMG_20230423_111220035.jpg 
Views:	4 
Size:	93.8 KB 
ID:	1358Click image for larger version. 

Name:	IMG_20230507_114358671.jpg 
Views:	6 
Size:	87.4 KB 
ID:	1359Click image for larger version. 

Name:	IMG_20230507_114426486.jpg 
Views:	5 
Size:	92.0 KB 
ID:	1360Click image for larger version. 

Name:	IMG_20230423_151847457.jpg 
Views:	5 
Size:	92.5 KB 
ID:	1361

  8. #88
    Pole Position Member
    Join Date
    Aug 2018
    Location
    Houston, Tx
    Posts
    89
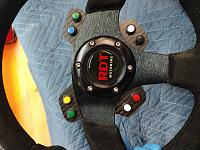
    Also made steering wheel mounted turn signal, high beam and horn buttons, probably about $35 in parts, Click image for larger version. 
Name:	IMG_20230401_123115705.jpg 
Views:	5 
Size:	95.0 KB 
ID:	1362

  9. #89
    Rookie Member
    Join Date
    Oct 2019
    Location
    Palm Beach, FL, USA
    Posts
    3
    Dave, did you ever get your car finished ?
    Photos ?

  10. #90
    Pole Position Member
    Join Date
    Aug 2018
    Location
    Houston, Tx
    Posts
    89
    Hi there, been a while, life gets in the way of these side projects but have been on to painting now, interior panels first then body, I'll try to add a few pics

Posting Permissions

  • You may not post new threads
  • You may not post replies
  • You may not post attachments
  • You may not edit your posts
  •