Page 1 of 10 123 ... LastLast
Results 1 to 10 of 94

Thread: Dave Bivens Mirage Build

  1. #1
    Pole Position Member
    Join Date
    Aug 2018
    Location
    Houston, Tx
    Posts
    89

    Dave Bivens Mirage Build

    Hello, first of all, this site's been a great resource for me in my build process, I've looked through a ton of posts to get ideas but haven't posted much of anything myself but now I figure I should share a bit so others can get ideas. Maybe my pics will spark ideas for someone else in their build. I'm a year and a half into this project, taking a lot longer than I ever imagined but oh well, they all do. I've taken a lot of pics along the way so the posts for a little while will be playing catch up to where I am now (bodywork, door hinges/latching mech, next is pop-up headlight mech.)

    I got a lot of ideas from the yahoo group as well but now that yahoo pretty much shut it down this is the place I guess ( there's a facebook group but I'm not a big zuckerburg fan so I stay away).

    Hopefully I'll have time to stay with posting as the project continues to roll along,

  2. #2
    Pole Position Member
    Join Date
    Aug 2018
    Location
    Houston, Tx
    Posts
    89
    Click image for larger version. 

Name:	20180615_115405.jpg 
Views:	16 
Size:	97.0 KB 
ID:	1115Click image for larger version. 

Name:	20180615_115346.jpg 
Views:	43 
Size:	92.7 KB 
ID:	1116Click image for larger version. 

Name:	20180615_123858.jpg 
Views:	12 
Size:	89.2 KB 
ID:	1117

  3. #3
    Pole Position Member
    Join Date
    Aug 2018
    Location
    Houston, Tx
    Posts
    89
    Started with unpacking and cleaning,
    Click image for larger version. 

Name:	20180703_132356.jpg 
Views:	29 
Size:	98.1 KB 
ID:	1118Click image for larger version. 

Name:	20180703_134629.jpg 
Views:	27 
Size:	98.1 KB 
ID:	1119Click image for larger version. 

Name:	20180703_114108.jpg 
Views:	26 
Size:	93.5 KB 
ID:	1120Click image for larger version. 

Name:	20180701_141558.jpg 
Views:	23 
Size:	95.1 KB 
ID:	1121

  4. #4
    Pole Position Member
    Join Date
    Aug 2018
    Location
    Houston, Tx
    Posts
    89
    After initial unpacking a blowing the dust and dirt off I dissembled to the bare frame, some parts I blasted and painted as I went, mostly suspension parts. Tryine to put away clean, ready to assemble parts rather than store a bunch of rusty pull-offs on the shelf. It had some nice stuff as bought, new rims/tires, new koni special D's, a bunch of brake parts, windshield, new radiator, a flipped gear trans... lots of good stuff.

    Click image for larger version. 

Name:	20180812_131521.jpg 
Views:	18 
Size:	82.7 KB 
ID:	1122Click image for larger version. 

Name:	20180722_193317.jpg 
Views:	12 
Size:	93.0 KB 
ID:	1123
    Click image for larger version. 

Name:	20180908_090737.jpg 
Views:	10 
Size:	92.4 KB 
ID:	1124

  5. #5
    Pole Position Member
    Join Date
    Aug 2018
    Location
    Houston, Tx
    Posts
    89
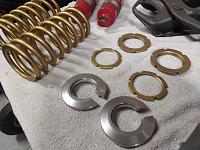
    Coil overs cleaned up nice,
    Click image for larger version. 

Name:	IMG_20201007_182944419.jpg 
Views:	7 
Size:	96.0 KB 
ID:	1125

  6. #6
    Pole Position Member
    Join Date
    Aug 2018
    Location
    Houston, Tx
    Posts
    89
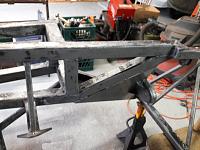
    Strip and metal prep the chassis, what a pain that was! Also, it had a roll bar added to the chassis and went up and around the fiberglass windshield frame, sort of molded to it with body filler, I wanted upper doors so had to remove all that.
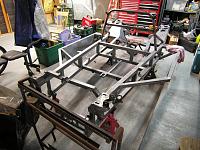
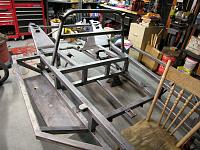
    Click image for larger version. 

Name:	DSCN6985.jpg 
Views:	23 
Size:	97.0 KB 
ID:	1126Click image for larger version. 

Name:	DSCN7013.jpg 
Views:	18 
Size:	96.3 KB 
ID:	1127

  7. #7
    Pole Position Member
    Join Date
    Aug 2018
    Location
    Houston, Tx
    Posts
    89
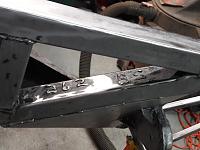
    I think I found the Chassis # under the rear passenger side suspension upright? Looks like "262___85"? There have been no other marking anywhere on this car, nothing on the frame or body anywhere else but here,
    Click image for larger version. 

Name:	chassis number3.jpg 
Views:	16 
Size:	85.1 KB 
ID:	1128Click image for larger version. 

Name:	chassis number2.jpg 
Views:	16 
Size:	87.2 KB 
ID:	1129

  8. #8
    Rookie Member
    Join Date
    Sep 2019
    Location
    North Carolina
    Posts
    6
    Welcome Dave! I'm putting a roll bar around my windshield, metal firewall between cabin and engine bay, additional structure/crush zones to protect legs.

  9. #9
    Champion Member Blueovalz's Avatar
    Join Date
    Jul 2014
    Location
    Little Rock, AR
    Posts
    279
    Glad to see another project kicked off. It was kinda quite for a while there. So...what's your goal? What do you want to do with car (street, show, track, one, or all?), and what do you want to do with the car (enhancements, upgrades, fixes, etc)?

    Ox
    Last edited by Blueovalz; 01-10-2021 at 11:06 PM.

  10. #10
    Pole Position Member
    Join Date
    Aug 2018
    Location
    Houston, Tx
    Posts
    89
    Hey Bobby, I'd like to see some pics of that, I figure I sit so low down in the car between the frame rails and my head is pretty close to the rear bulkhead loop that I have some protection, but who am I kidding, it's a fiberglass kit car not a 2020 Camry. I did add a beefy structure to support the steering column.

    If I find any pics of the windshield roll bar before I cut it out I'll post it for you.

Posting Permissions

  • You may not post new threads
  • You may not post replies
  • You may not post attachments
  • You may not edit your posts
  •